I run a small homelab on a Mac mini M4 (Base model) — a privacy-first setup where I try to replace cloud services with self-hosted equivalents I actually control. One of the most useful things I’ve built on it is a daily news digest: every morning it pulls my RSS feeds, summarizes them with a local LLM, and sends the result to my Telegram app. No third-party AI service, no API bill, the summarization happens entirely on my own hardware.
This post is a full walkthrough — what n8n and Ollama are, how I set each one up, a quick tour of n8n’s building blocks, and then the actual RSS-summary workflow step by step.
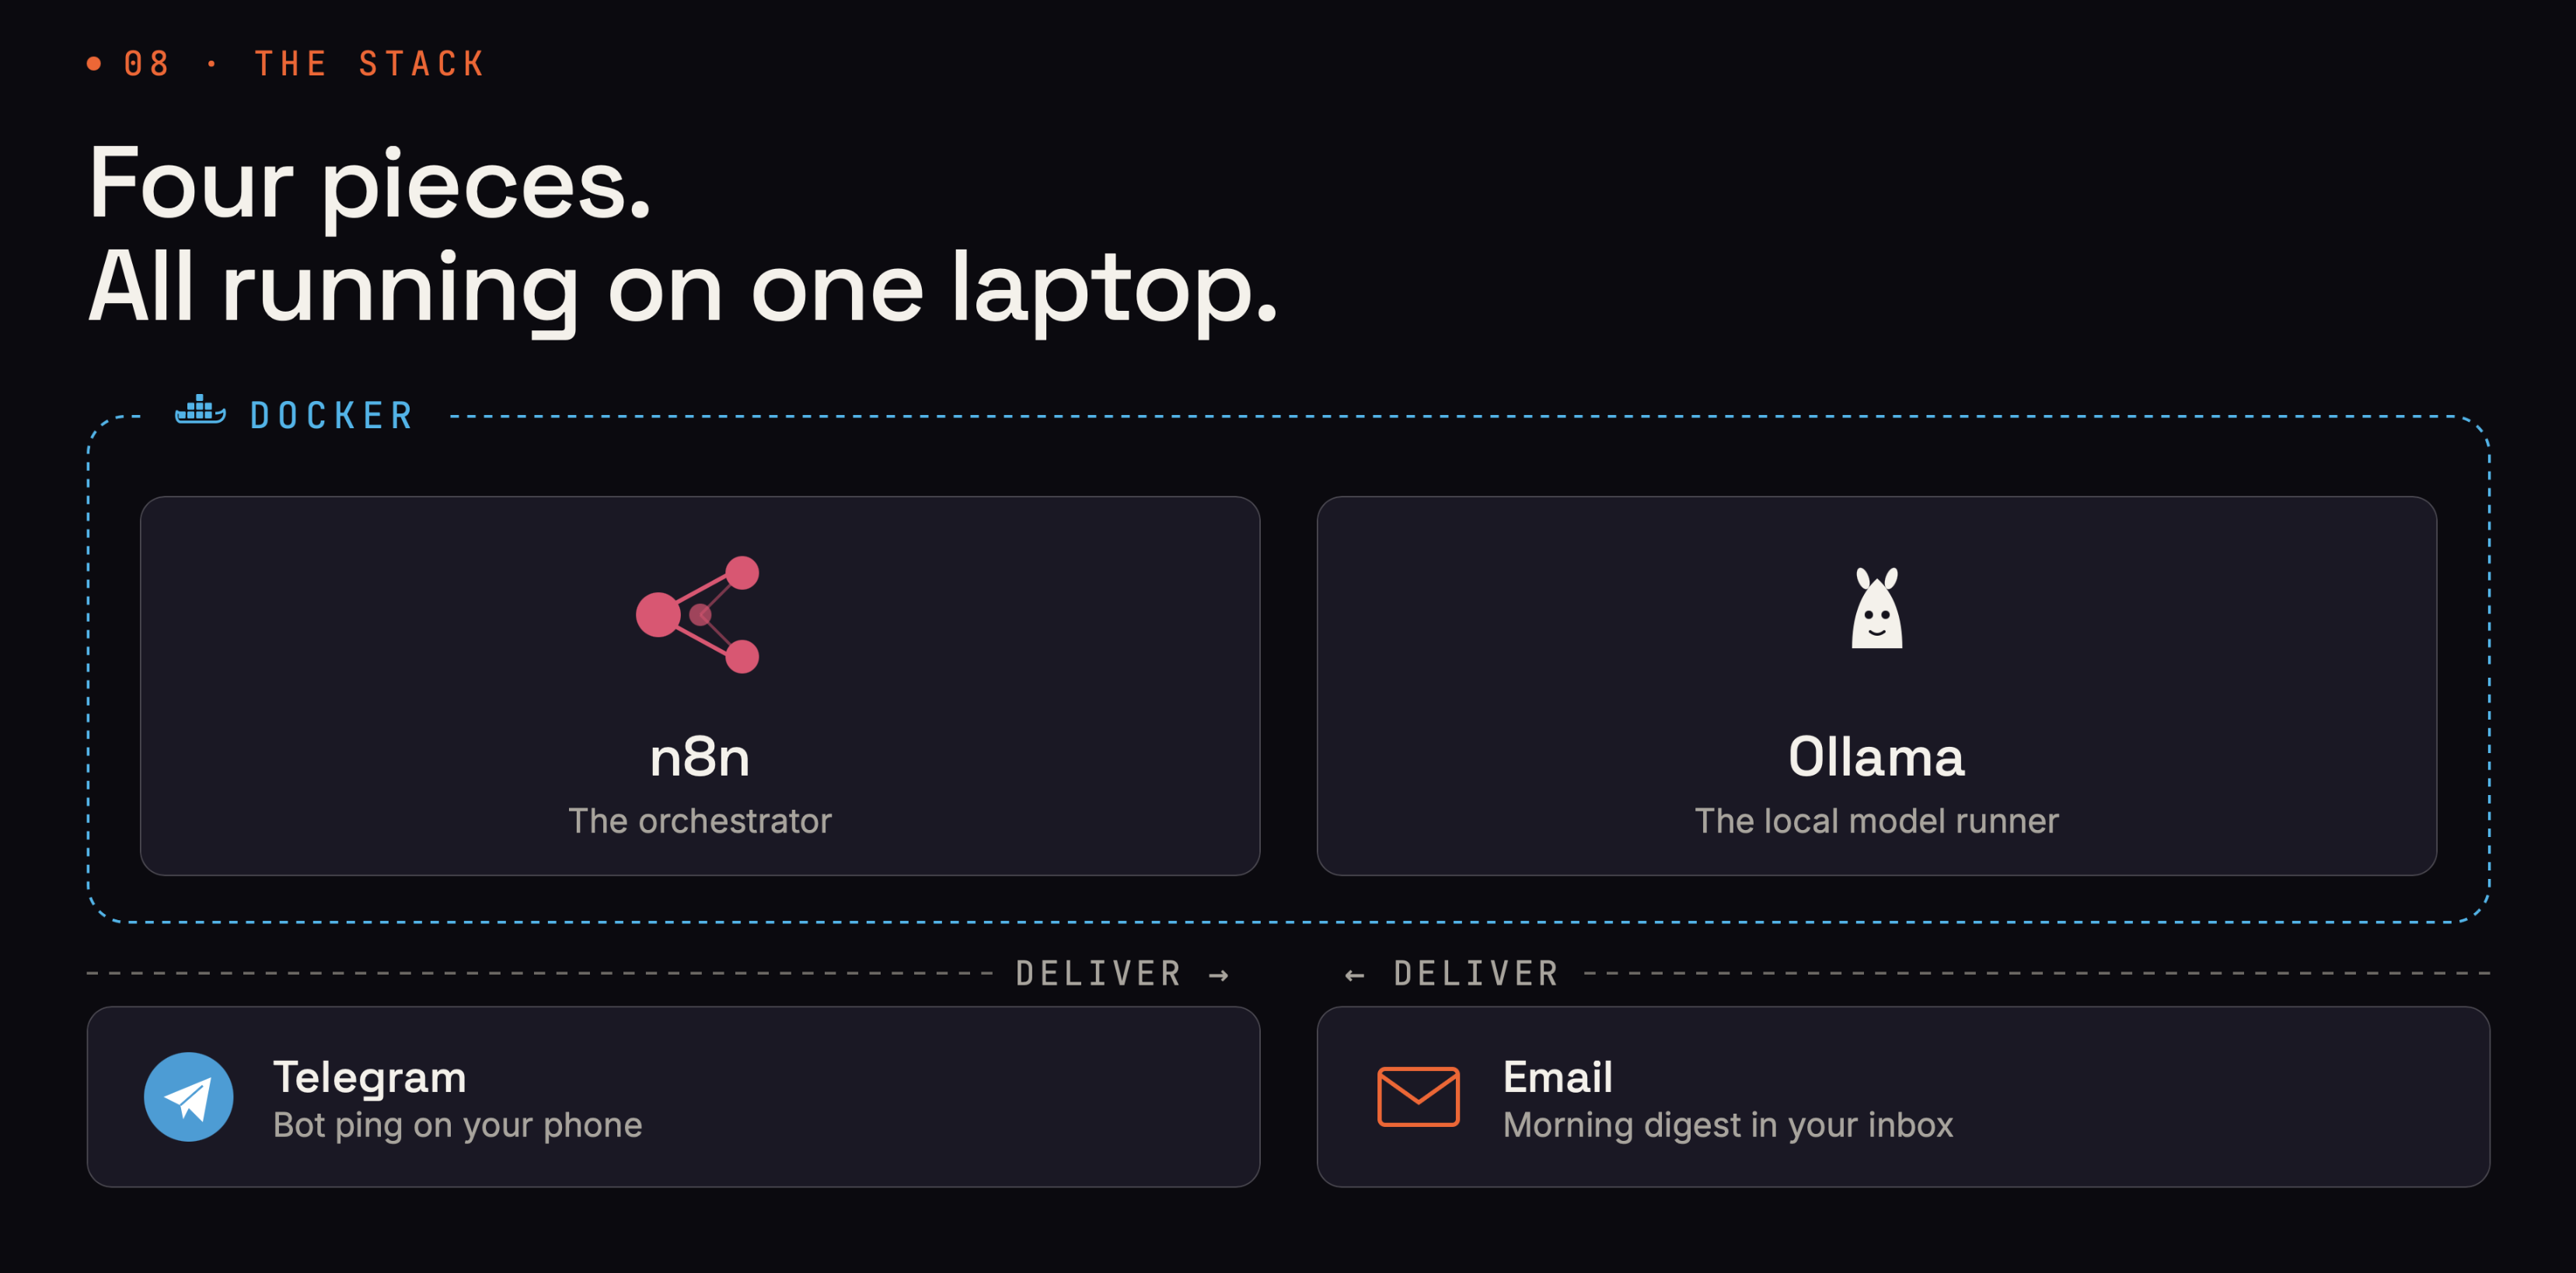 The whole stack at a glance: n8n orchestrates, Ollama runs the model locally (both in Docker), and the digest gets delivered to Telegram.
What are n8n and Ollama?
n8n is a workflow automation tool — think of it as a self-hostable, developer-friendly alternative to Zapier or Make. You build automations visually by wiring together nodes on a canvas: a trigger kicks things off, and data flows left to right through nodes that fetch, transform, and send it. The big draw for a homelab is that you host it yourself, so your automations and credentials stay on your own machine.
Ollama makes running open large language models locally about as easy as it gets. You pull a model once and it serves it over a simple local API — no GPU cluster, no cloud account. Ollama does offer a cloud option, but for a fully self-hosted setup we won’t use it. On Apple Silicon the unified memory handles small models comfortably, which makes the Mac mini a surprisingly capable little inference box.
Put them together and you get automations that can think — summarize, classify, rewrite — without sending a single token to a paid API.
Setting up n8n in Portainer
I manage all my homelab apps as Docker Compose stacks through Portainer.
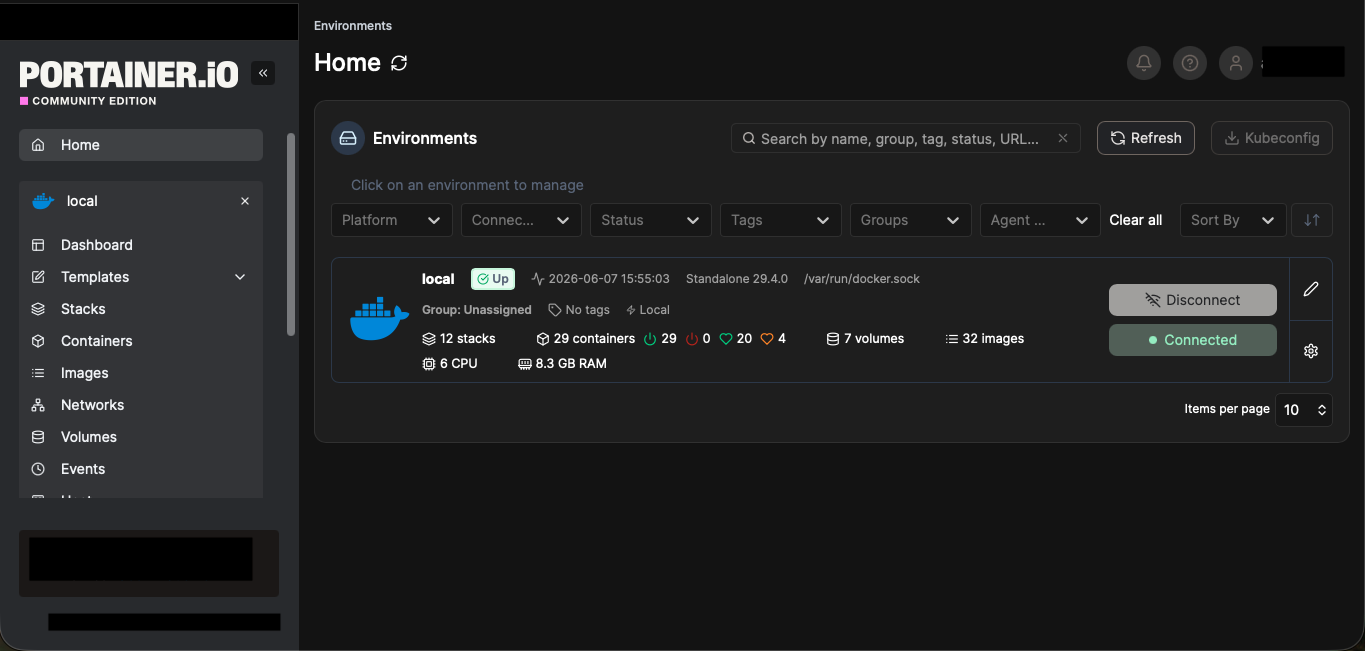 The Portainer dashboard - every homelab app lives here as a managed stack.
To add n8n, I go to Stacks → Add stack, give it a name, and paste in a compose file as the stack definition. Portainer then creates and manages the containers for me.
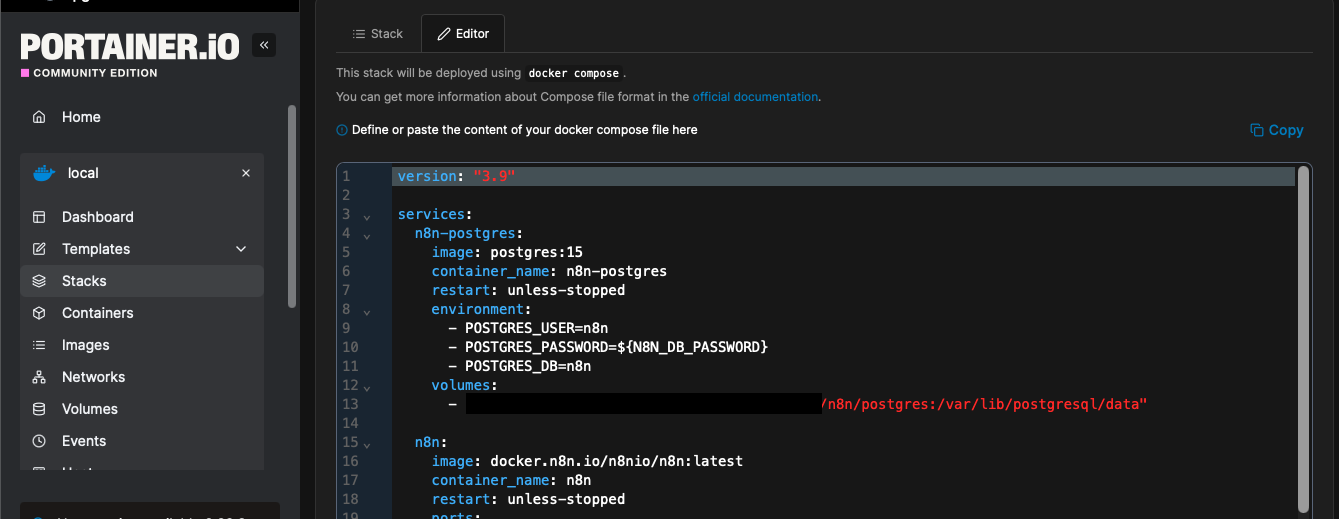 Adding n8n as a new stack by pasting the compose file into Portainer’s web editor.
Here’s the compose I used as the stack (I’ll drop the exact file below):
# docker-compose.yml — paste this into Portainer's "Web editor" when adding a stack
version: "3.9"

services:
  n8n-postgres:
    image: postgres:15
    container_name: n8n-postgres
    restart: unless-stopped
    environment:
      - POSTGRES_USER=n8n
      - POSTGRES_PASSWORD=${N8N_DB_PASSWORD}
      - POSTGRES_DB=n8n
    volumes:
      - "/Volumes/external_hdd/docker-data/volumes/n8n/postgres:/var/lib/postgresql/data"

  n8n:
    image: docker.n8n.io/n8nio/n8n:latest
    container_name: n8n
    restart: unless-stopped
    ports:
      - "1243:1243"
    extra_hosts:
      - "host.docker.internal:host-gateway"
    environment:
      - DB_TYPE=postgresdb
      - DB_POSTGRESDB_HOST=n8n-postgres
      - DB_POSTGRESDB_USER=n8n
      - DB_POSTGRESDB_PASSWORD=${N8N_DB_PASSWORD}
      - DB_POSTGRESDB_DATABASE=n8n
      - N8N_ENCRYPTION_KEY=${N8N_ENCRYPTION_KEY}
      - GENERIC_TIMEZONE=America/Chicago
      - TZ=America/Chicago
      - N8N_RUNNERS_ENABLED=true
      - N8N_SECURE_COOKIE=false
    volumes:
      - "/Volumes/external_hdd/docker-data/volumes/n8n/data:/home/node/.n8n"
    depends_on:
      - n8n-postgres
A few notes on what matters in an n8n stack:
- Persist the data volume. n8n stores your workflows, credentials, and execution history in
/home/node/.n8n. Mount a named volume or a host path there so nothing is lost when the container restarts. I have mapped it to my 5TB external HDD -/Volumes/external_hdd/docker-data/volumes/n8n/data - Set the timezone (
GENERIC_TIMEZONE/TZ) so the scheduler fires at your local time, not UTC. - Set the host/port env vars (
N8N_DB_PASSWORD,N8N_ENCRYPTION_KEY) so n8n generates correct URLs for itself.
Once the stack is up, n8n is reachable on its port and you can log in and start building.
n8n - http://localhost:1243
 The n8n editor’s homepage
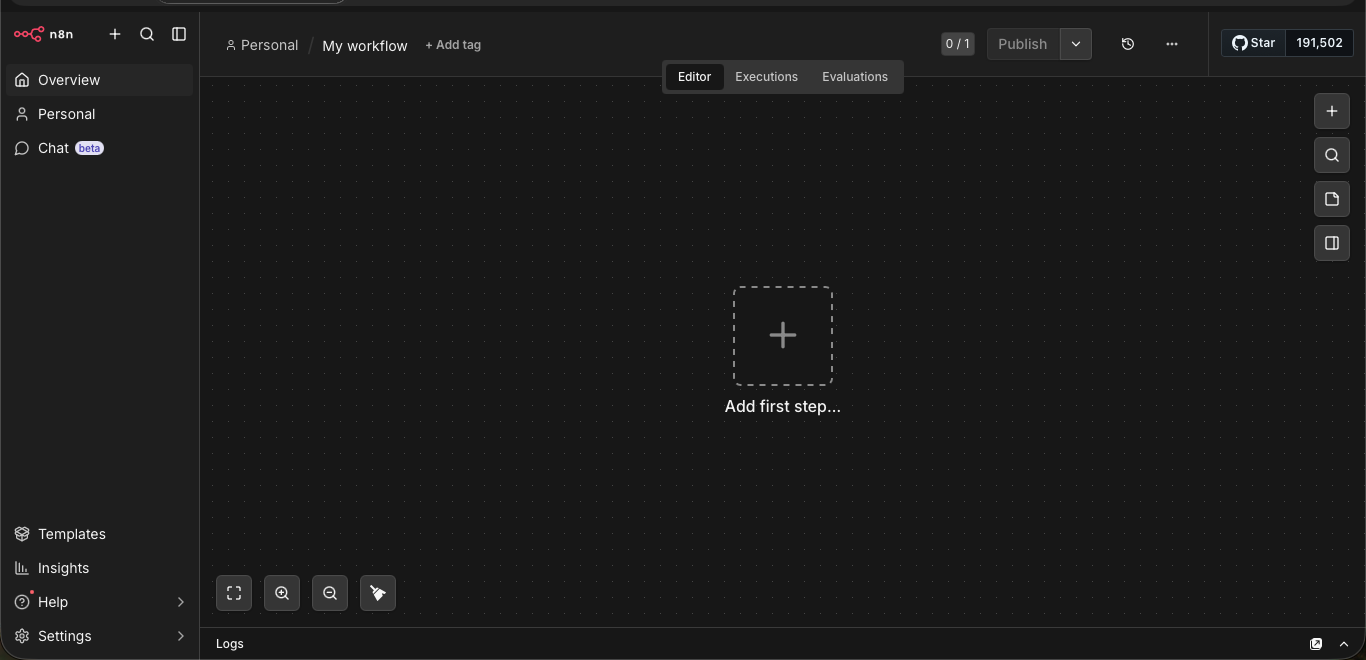 The n8n editor’s workflow canvas page — this is where workflows get built.
Setting up Ollama on macOS
Ollama runs natively on macOS — I run it directly on the host rather than in a container, so it gets full access to Apple Silicon’s performance.
1. Install it. Grab the macOS app from ollama.com (or brew install ollama).
2. Pull a model. I use Llama 3.2 — small, fast, and it returns clean, direct answers, which is exactly what you want for automation:
ollama pull llama3.2
ollama list
Not sure whether a given model will fit in your machine’s memory? caniusellm.com is a handy quick check to check your RAM and it tells you which models will run comfortably, which is useful before you pull something larger than llama3.2.
3. Make it reachable from containers. By default Ollama only listens on 127.0.0.1, which a Docker container can’t reach. Set it to listen on all interfaces so n8n can call it:
launchctl setenv OLLAMA_HOST "0.0.0.0"
Then restart Ollama. Now containers can hit it.
4. Connect it in n8n. In n8n, create an Ollama credential. The only field that matters is the base URL — and localhost won’t work here, because from inside the n8n container “localhost” is the container itself, not your Mac. Use one of:
http://host.docker.internal:11434— Ollama on the Docker host (this is the macOS case).http://<your-mac-lan-ip>:11434— a reliable fallback.
Test the credential before building anything real. (I’ll show the actual credential screen in the workflow walkthrough below, where it’s used in context.)
 Configuring the Ollama credential in n8n — the base URL is the only field that matters.
A quick tour of n8n’s building blocks
Before the workflow, the vocabulary in one paragraph: a node is a single step (fetch a feed, call a model, send a message). A trigger node is the special node that starts a workflow — on a schedule, a webhook, or manually. Data passes between nodes as a list of items, and you reference fields from earlier nodes using expressions (the {{ }} syntax). That’s really all you need to read the workflow below.
The workflow: daily news digest to Telegram
Here’s the automation itself — in n8n it’s titled “Daily News digest with RSS, Llama 3.2 summarization & Telegram.” Every morning it pulls my feeds, filters down to the latest news, summarizes each story with the local model, and posts the digest to Telegram.
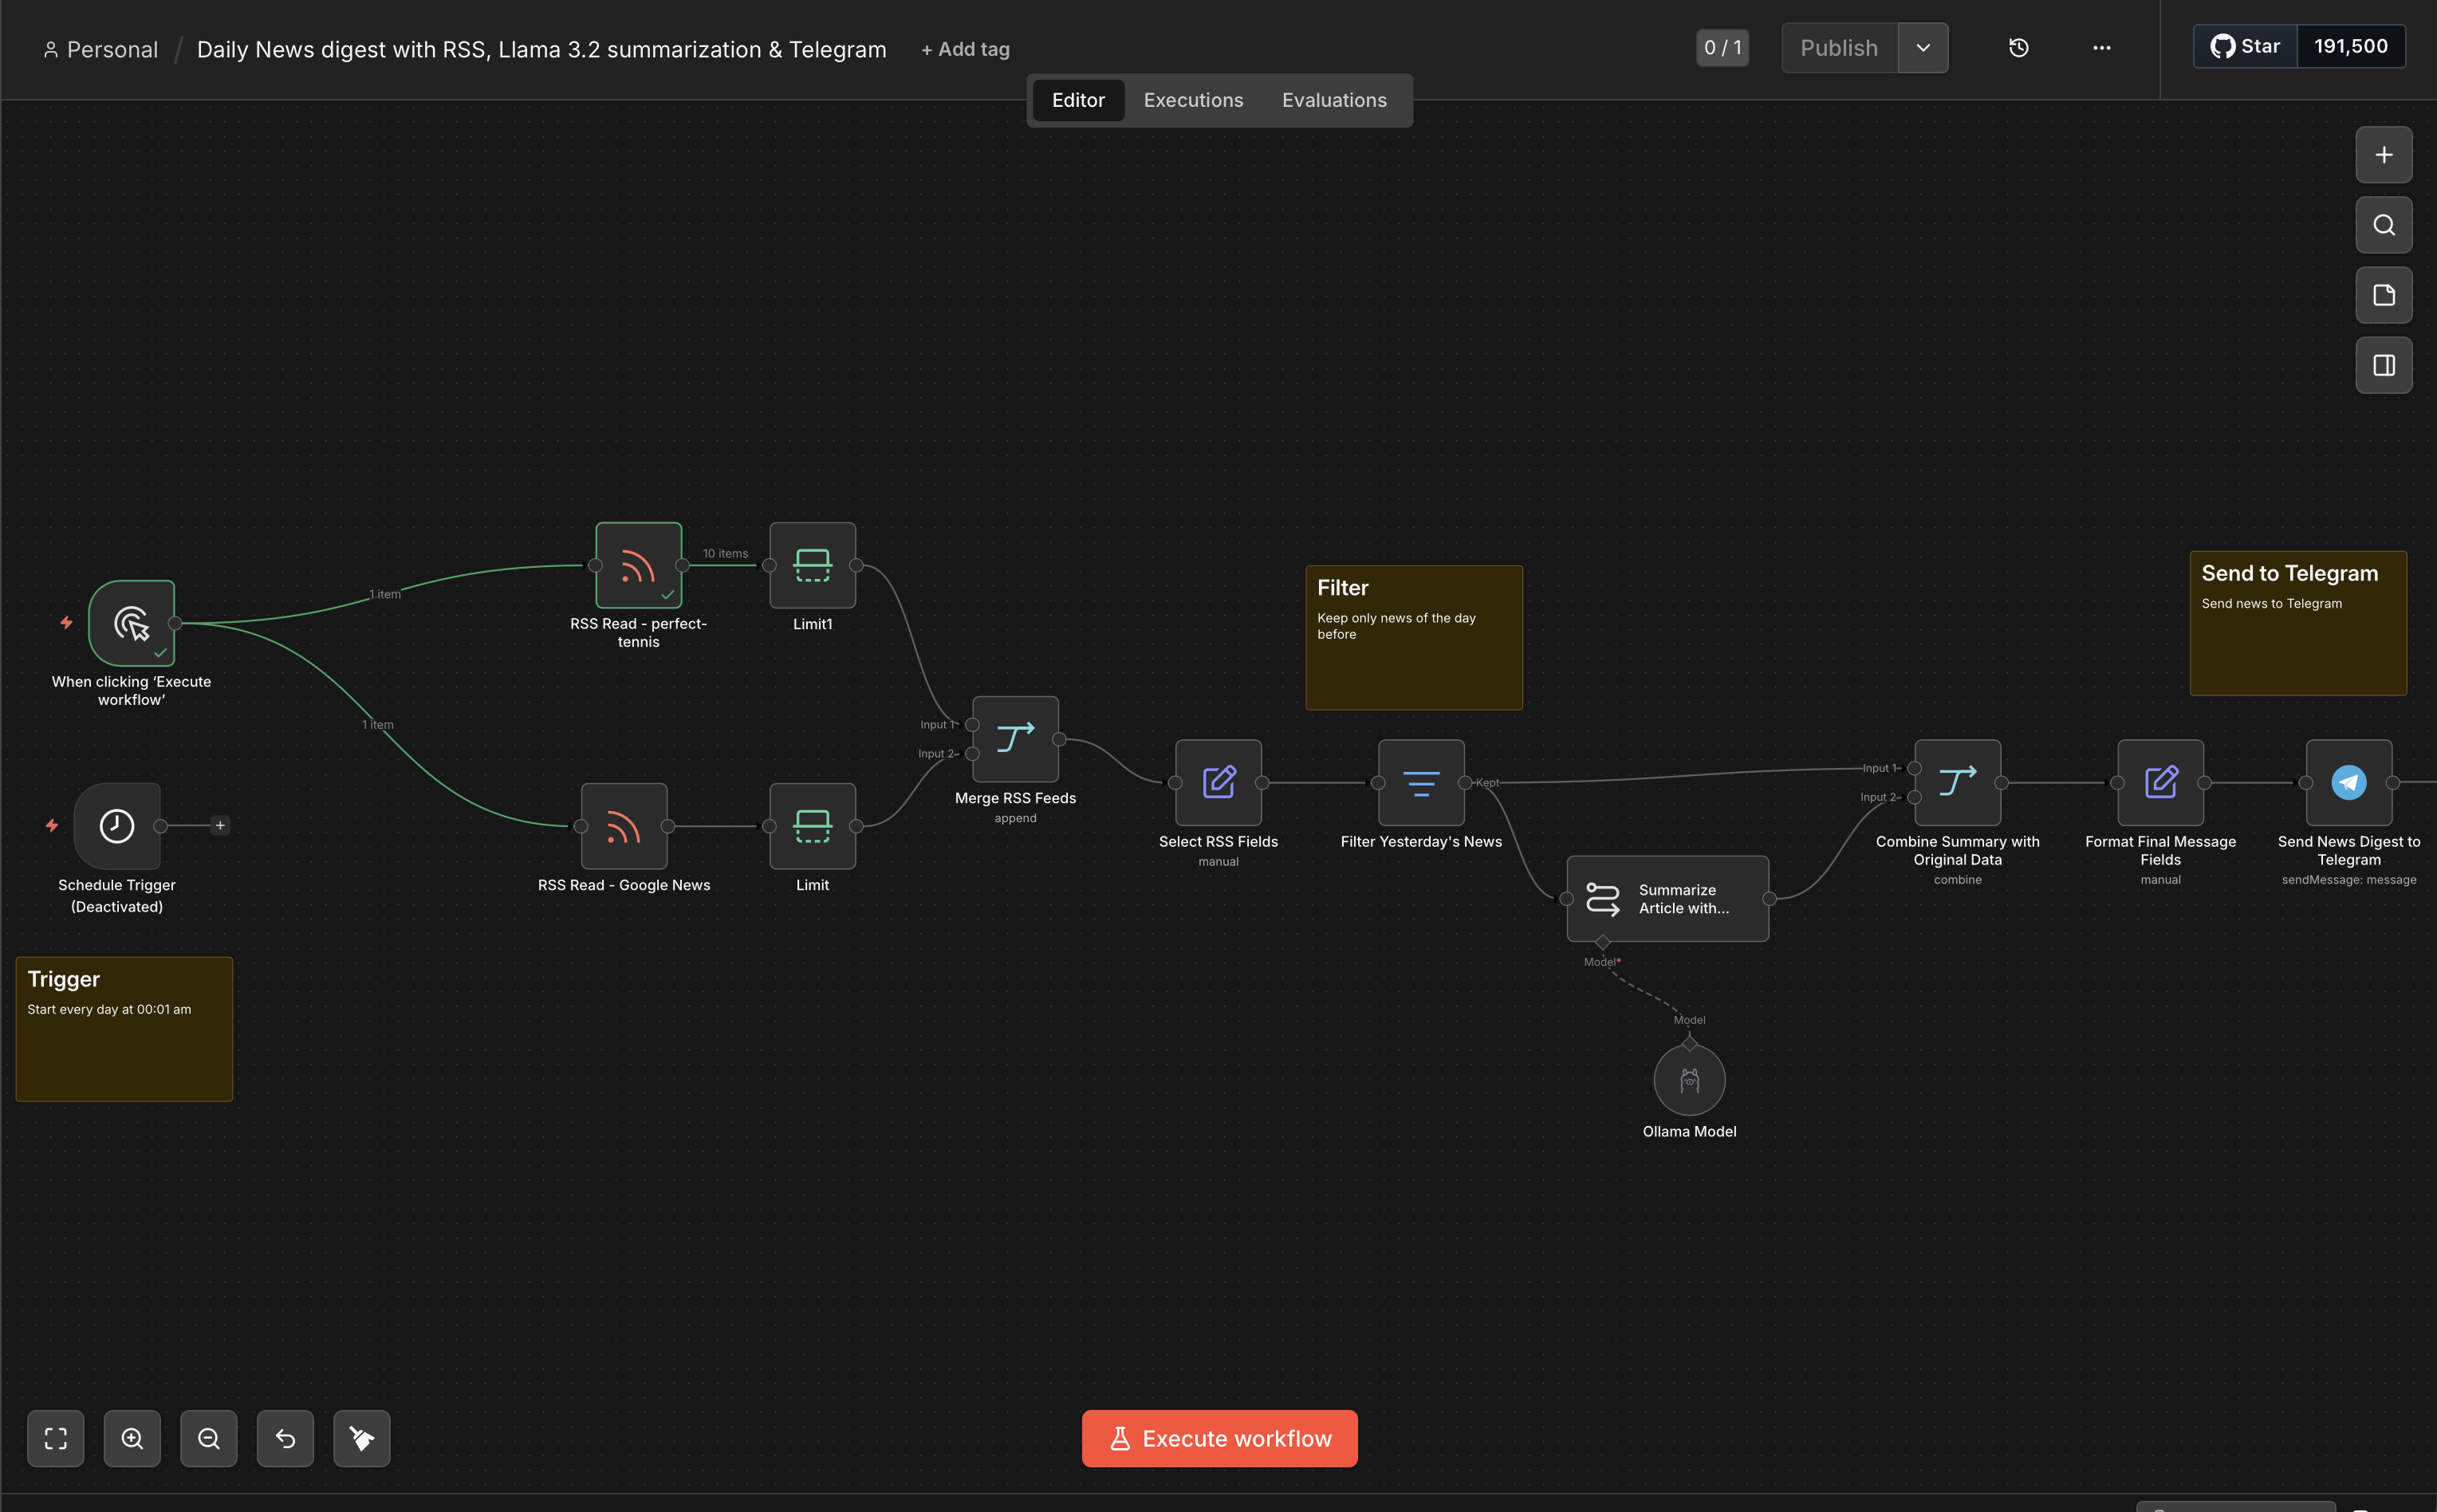
The full workflow on the n8n canvas, left to right: trigger → RSS reads → limit → merge → field select → date filter → summarize → combine → format → Telegram.
Reading the canvas from left to right, here’s what each node does.
Step 1 — Schedule Trigger. A Schedule Trigger fires the workflow once a day. This is what makes it unattended — I never open n8n to run it. (There’s also a manual “Execute workflow” trigger wired in alongside it, which is handy for testing without waiting for the schedule.)
Step 2 — RSS Read (one node per feed). Two RSS Read nodes pull my feeds in parallel — one for Perfect Tennis (I follow the tour closely) and one for Google News. Keeping them as separate nodes makes the canvas readable and makes it obvious which feed broke if one goes down. If you’re hunting for good feeds to point these at, the awesome-rss-feeds list is a great curated directory across just about every topic.
Step 3 — Limit. A Limit node after each feed caps how many items move forward, so a noisy feed can’t blow up the digest into a wall of text. A handful of stories per feed is plenty.
Step 4 — Merge. A Merge node (in append mode) combines the items from both feeds into one list, so everything downstream is a single stream of articles.
Step 5 — Select RSS Fields. A Set/Edit Fields node trims each item down to just what matters — title, creator, pubDate, content, and link — so the model isn’t fed a pile of RSS boilerplate.
Step 6 — Filter (yesterday’s news). A Filter node keeps only items published in the last day, so each morning’s digest is genuinely new and not a rerun of stories I’ve already seen.
Step 7 — Summarize with Ollama. This is the only “AI” step, and it runs entirely on the Mac. A summarization node is backed by an Ollama Model sub-node pointed at my Ollama credential and the llama3.2:latest model. The fields exposed from the prior step (title, creator, pubDate, content, link) feed straight in.
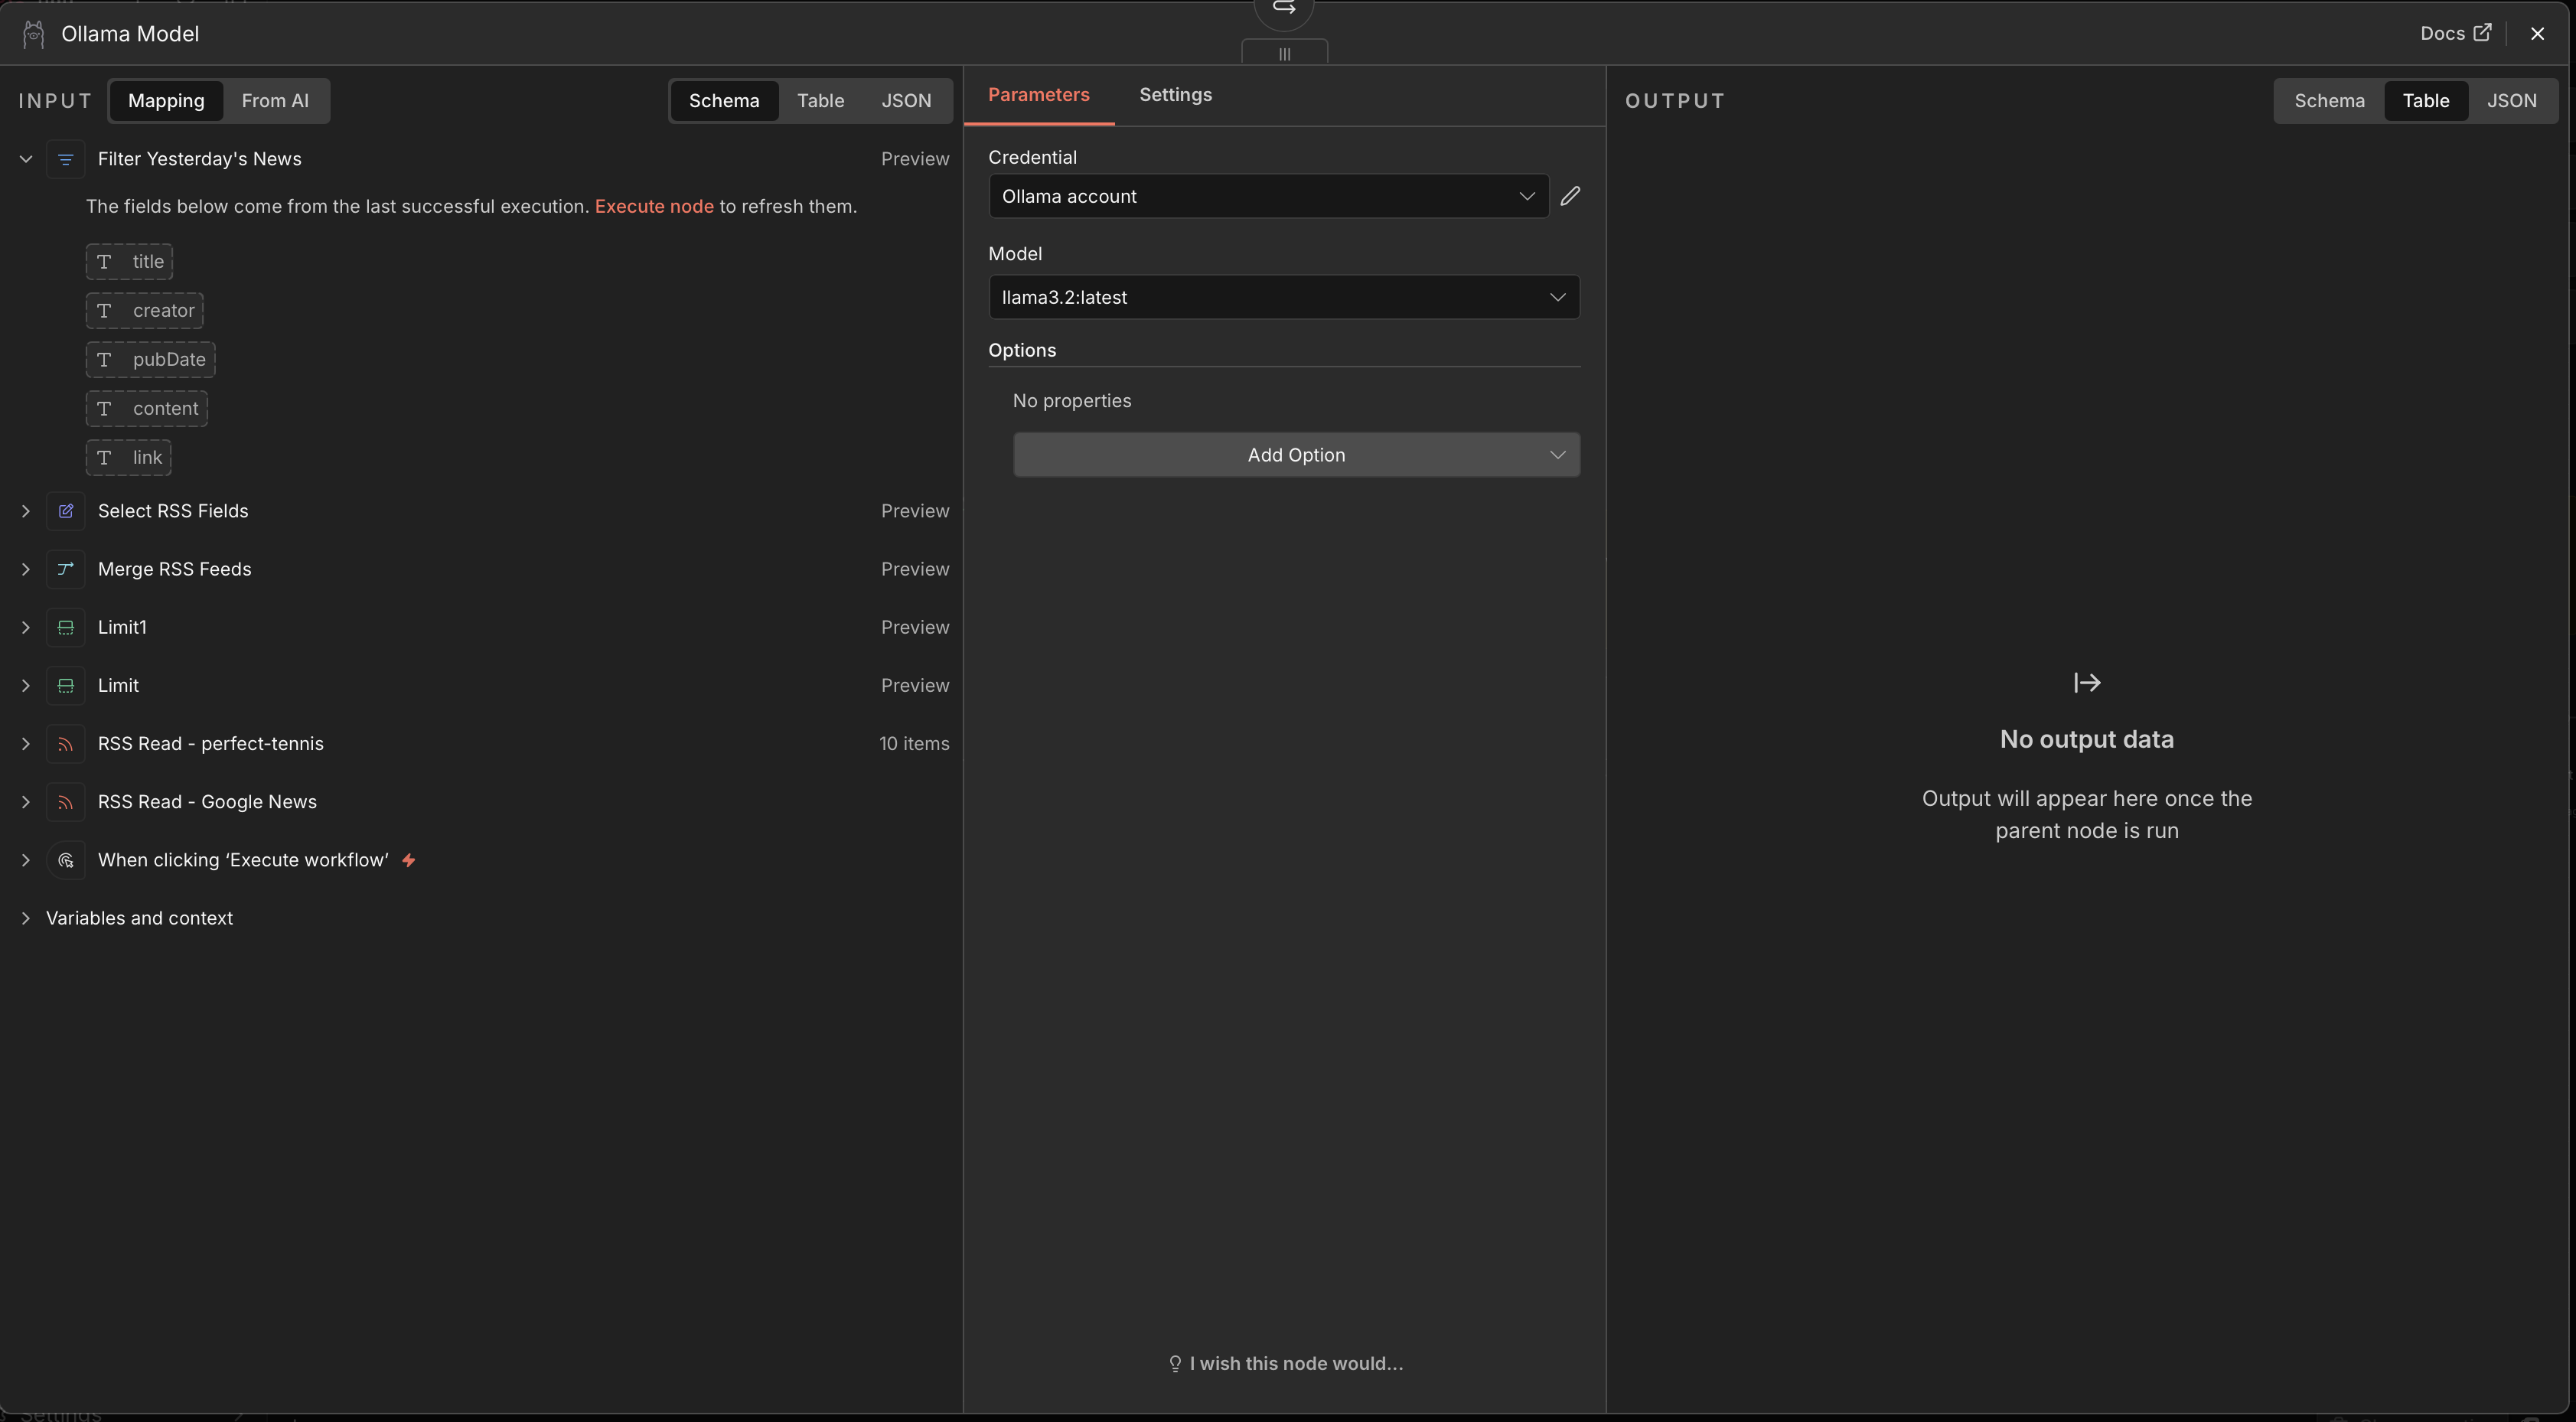 The Ollama Model node — credential set to “Ollama account,” model
 llama3.2:latest, with the RSS fields available as input.
The Ollama credential itself is trivial to set up: just point the Base URL at http://host.docker.internal:11434 and test the connection.
The Ollama credential in n8n — the base URL is the only field that matters; no API key needed for a default Ollama install.
Step 8 — Combine Summary with Original Data. A second Merge node (in combine mode) stitches the model’s summary back together with the original article fields, so the final message can include the real title and link rather than just the model’s prose.
Step 9 — Format Final Message. A Set/Edit Fields node assembles the actual text that gets sent — title, author, publication date, link, and the summary — into one clean, readable message.
Step 10 — Send to Telegram. Finally a Telegram node posts each formatted digest to my chat. Setting up the bot takes two minutes:
- Open @BotFather in Telegram and send
/newbot. Follow the prompts to name it; BotFather hands you an API token. - In n8n, create a Telegram credential and paste in that token.
- Get your chat ID — message your new bot once, then check
https://api.telegram.org/bot<TOKEN>/getUpdatesto find the chat ID in the response (or use a helper bot like@userinfobot). - In the Telegram node, set the chat ID and map the formatted message into the text field.
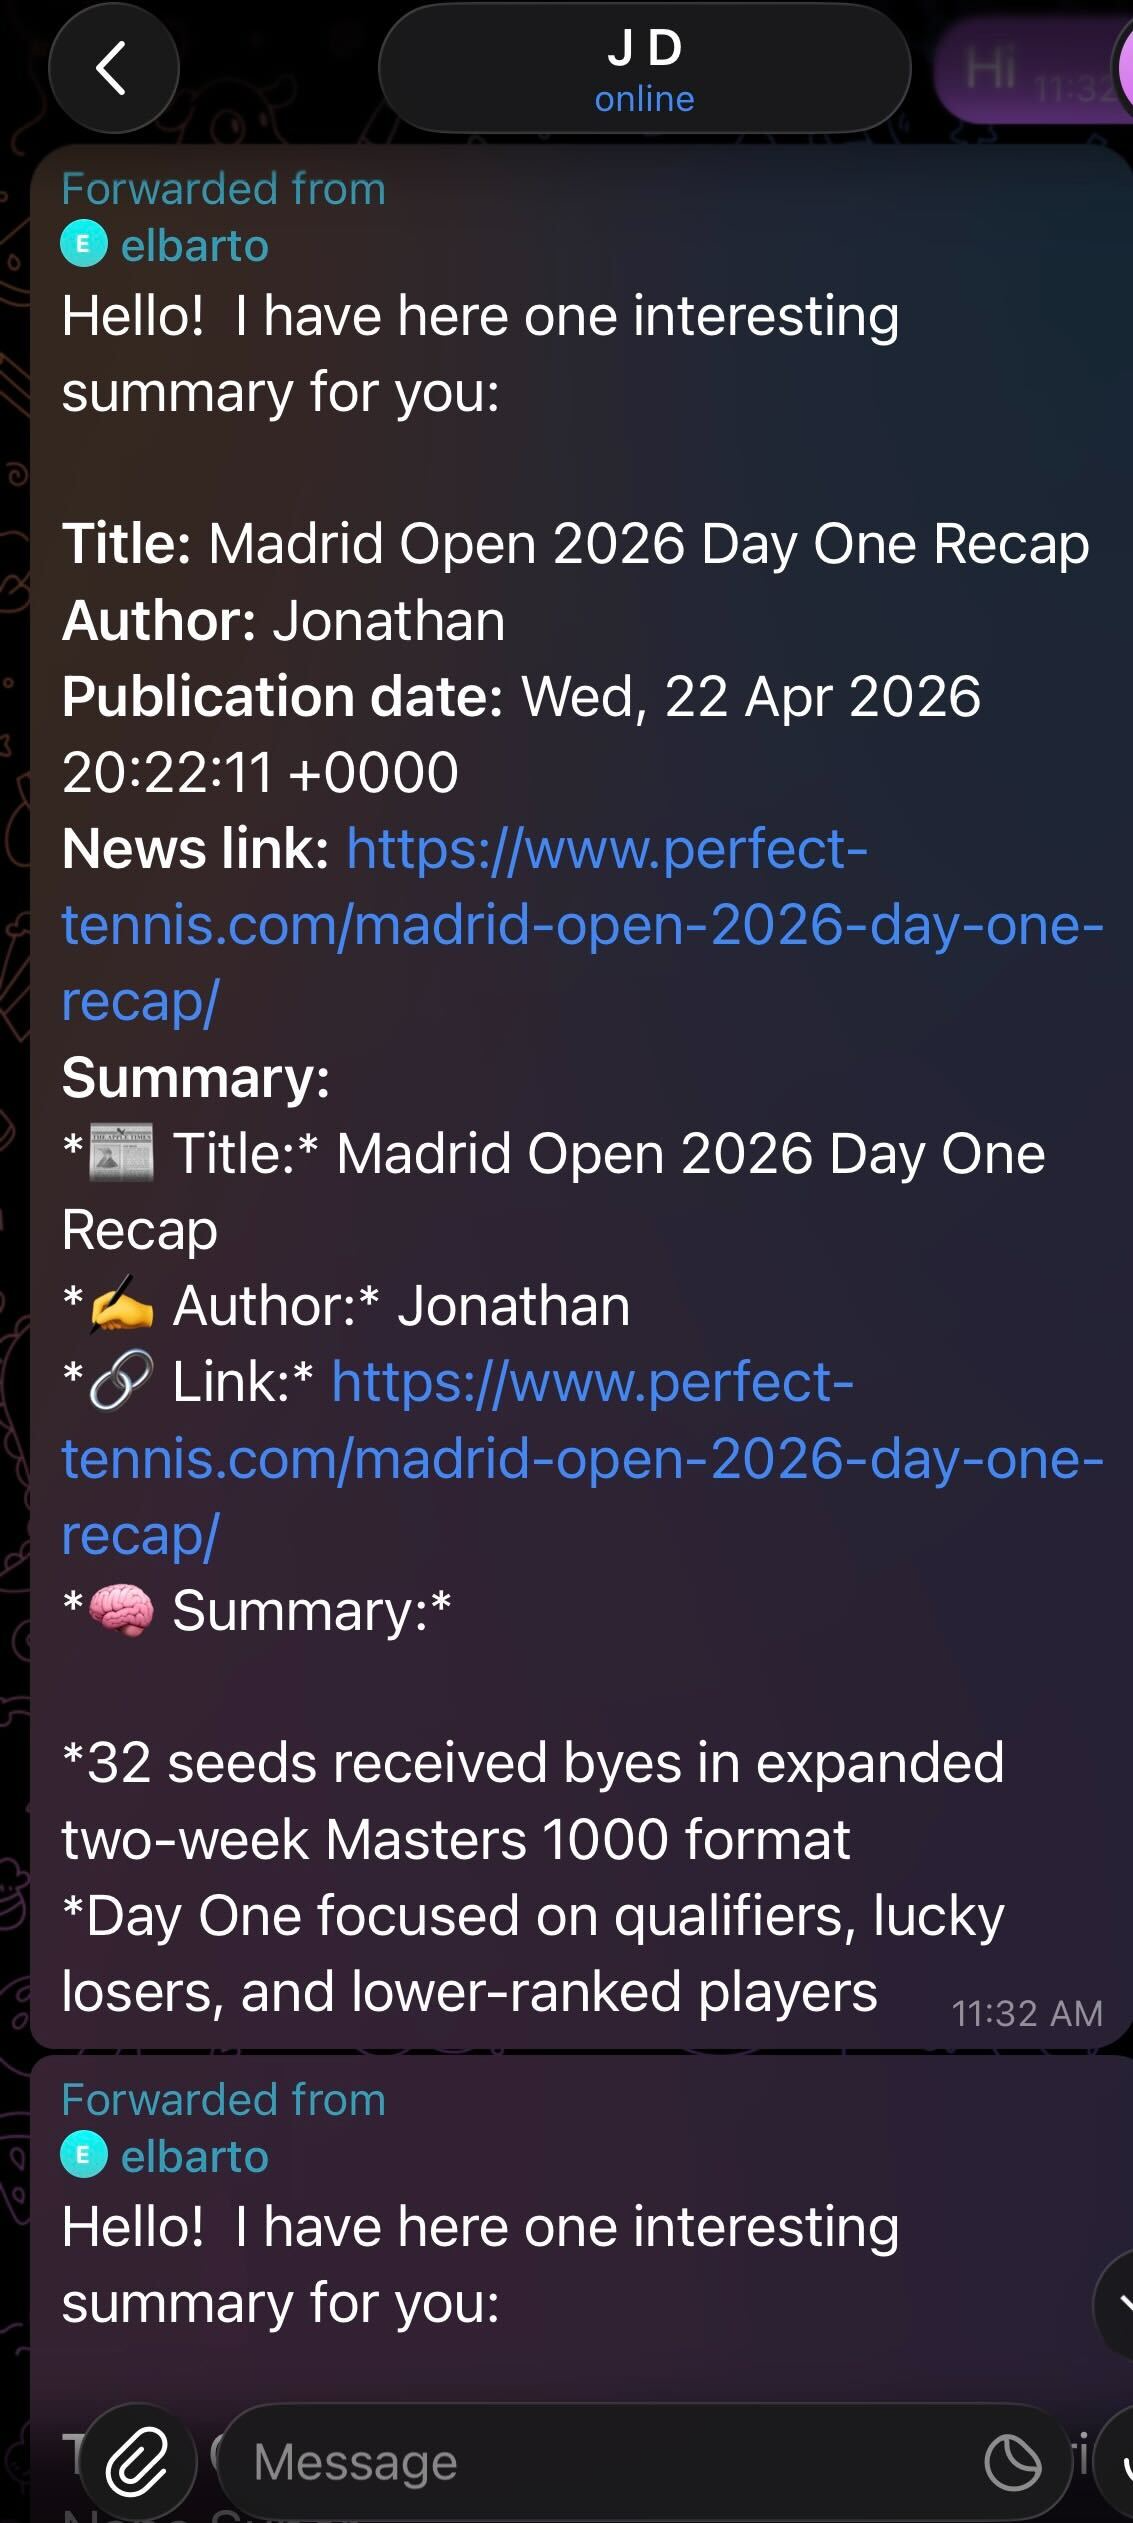 The finished digest as it lands in Telegram each morning — title, author, date, link, and a bulleted summary.
That’s the whole pipeline: it runs itself just after midnight, the summarization happens locally on the Mac, and I wake up to a tidy news digest on my phone.
Wrapping up
So that’s a complete, self-hosted AI automation: n8n running as a Portainer stack handles the orchestration, Ollama on macOS provides local inference with Llama 3.2, and the workflow ties RSS, an LLM summary, and Telegram delivery into something that runs unattended every morning. The only thing leaving my hardware is the final Telegram message — the feeds are public and the summarization is entirely local.
One thing I deliberately left out here: how I actually reach these services securely from anywhere without exposing a single port to the public internet. That’s where Tailscale comes in, and it’s the backbone of nearly every app in my homelab. I’ll be kicking off a Self-Hosted Apps with Tailscale series next, where I’ll cover the sidecar pattern, MagicDNS, and HTTPS for your services — starting from the ground up.
If this sounds interesting to you then go build something similar, n8n’s workflow template gallery is the best place to start — thousands of ready-made workflows you can import and adapt instead of building from a blank canvas.
Follow along, and find me on LinkedIn and this blog for more practical AI posts.